Agent Substrate on Amazon EKS
What differs from kind and GKE when you run Agent Substrate v1.0.0 on EKS for DefenseClaw - private nodes, S3 snapshots, microVM nodes, ECR images, credential injection and a unique token issuer.
Upstream documents kind and GKE. This page lists what to do differently on EKS. The files it mentions (the overlay patch, the install file and the asset-staging script) are in docs/examples/substrate/eks/ in the DefenseClaw repository. On EKS with both sandbox classes, actors create, answer HTTP, suspend and resume with memory kept, snapshots go to S3, egress is default deny, and a Bedrock call works from an actor through an injected credential. Placeholders: BUCKET, CLUSTER.
The cluster
- Version. The account default (for example 1.37). Nodes: Amazon Linux 2023.
- Endpoint. Private only is fine. Add an ingress rule on the cluster security group (tcp 443) from the VPC range so the hosts that use
kubectlcan reach it, and give each caller an EKS access entry. - Subnets and egress. Private nodes need a way out: the control plane pulls images from
ghcr.io, the node agent fetches gVisor from a Google bucket, and the microVM install downloads Kata and Cloud Hypervisor from GitHub. VPC endpoints alone are not enough. Use private subnets with a NAT gateway. - Node metadata. Require IMDSv2 with a hop limit of 2. The object-store plugin runs in a pod and takes its S3 credentials from the node role. With a hop limit of 1 the pod can't reach the metadata service.
- Node disk. gp3, 200 GiB, encrypted. The snapshot cache lives on the boot disk.
- Node groups. Managed groups with a launch template.
gvisor: twom8i.2xlarge, no taint. It also hosts the control plane, Postgres, the router and the egress gateway.microvm: onem8i.2xlargewithCpuOptions.NestedVirtualization=enabledin the launch template. EKS managed node groups accept it;/dev/kvmappears and the CPU showsvmx. Taint itate.dev/sandboxClass=microvm:NoScheduleand label it. The microVM worker pool selects it withtemplate.nodeSelector. Use a current boto3 or AWS CLI, because older ones don't know the parameter.
- Add-ons. EKS installs vpc-cni, kube-proxy and coredns. Postgres needs a volume, and EKS 1.37 has no in-tree EBS provisioner, so install the
aws-ebs-csi-driveradd-on (an IRSA role withAmazonEBSCSIDriverPolicy, which needs the cluster OIDC provider) and make agp3StorageClass the default.
Installing Substrate
ate-setup has no EKS profile. Outside --kind, it assumes Google Cloud Storage everywhere. The object-store plugin does support S3 with the pod's ambient AWS credentials, and the shortest working path is to run ate-setup with --kind --context EKS_CONTEXT and a patched copy of the kind overlay (eks-overlay.patch, with substrate-install.yaml as the install file):
- keep
ATE_STORAGE_BACKEND=s3andAWS_REGION, and deleteAWS_ENDPOINT_URL,AWS_S3_USE_PATH_STYLEand the test object-store keys, so the plugin uses the node role; - drop the test object store from the kind kustomization;
- point the image credential provider paths at the EKS node provider (
/etc/eks/image-credential-provider/config.json) so actors can use ECR images; - in the install config, set prebuilt images (
images.repo,images.tag=v1.0.0) and name the snapshot location explicitly:storage.snapshotLocation: s3://BUCKET/snapshots/.
Then deploy ate-system with --sandbox-classes gvisor. It takes about 80 seconds. Upstream publishes no ate-setup binary, so build it from the same tag as the manifests.
For microVM actors, the kind-only asset step doesn't work on EKS. Assemble the assets with ate-setup deploy sandboxconfig --sandbox-classes gvisor,microvm (it fails at the last step; that is expected), upload each file to s3://BUCKET/microvm-assets/amd64/<sha256>, render the microVM template with BUCKET_SCHEME=s3 ASSET_BUCKET_NAME=BUCKET, and apply it (stage-assets.sh does the last two steps). Keep the assets outside the snapshot prefix: the plugin refuses URLs under it.
Storage and images
- One S3 bucket with server-side encryption, public access blocked and a lifecycle rule. Snapshots under
snapshots/, assets undermicrovm-assets/. - Give the node role a policy limited to that bucket: list, get, put, delete and multipart. With S3 there is no per-actor storage credential, unlike Google Cloud Storage.
- An ActorTemplate image must be pinned by digest. A tag fails with
must be pinned by digest. For ECR, push and use the digest.template publishto ECR needs--registry-auth-host HOST --registry-user AWS --registry-password-file FILE: the login goes only to a host named there. - The controller and the gateway read each template's attestation from its registry. For ECR and other private registries they need a login: see Attested templates in a private registry.
template publishstill takes its own--registry-*flags, as above. - Upstream demo images aren't published. Use your own.
Attested templates in a private registry
By default the controller and the gateway read attestations without a login. Against a private registry that gets HTTP 401, and create is refused as sandbox.template_unverified. Give them a login. Each login is sent only to its own registry host, after that host asks for it, and never to another registry or to a token service the login does not name.

Amazon ECR. No password is stored, and the token is renewed before it expires.
- List the registry in
config.substrate.templates.registry_auth.ecr_hosts:[<account>.dkr.ecr.<region>.amazonaws.com]. - Give the gateway and controller ServiceAccounts an IAM role, never the callout's. In the chart:
serviceAccounts.componentAnnotations.gatewayand.controllerset to{eks.amazonaws.com/role-arn: arn:aws:iam::<account>:role/<name>}. - The role trusts the cluster's OIDC provider for
system:serviceaccount:<namespace>:defenseclaw-gatewayand:defenseclaw-controller, with audiencests.amazonaws.com. Its permissions areecr:GetAuthorizationToken(resource*) andecr:BatchGetImage,ecr:GetDownloadUrlForLayerandecr:BatchCheckLayerAvailabilityon the template repositories.
IRSA reaches STS on 443, which the chart already allows. EKS Pod Identity works too, but also needs a networkPolicy.egress.extra rule to 169.254.170.23/32 port 80.
Other private registries (Google Artifact Registry, Harbor, GHCR): create a Docker registry Secret and name it in the chart.
kubectl -n defenseclaw-system create secret docker-registry dc-template-registry --docker-server=REGISTRY_HOST --docker-username=USER --docker-password-file=FILE
helm upgrade defenseclaw-substrate CHART --reuse-values --set controller.templateRegistrySecret=dc-template-registry
The Secret is mounted read-only in the controller and the gateway (substrate.templates.registry_auth.docker_config). An update applies within about a minute.
A private OIDC issuer. If people sign in with an identity provider on a private CA, give the gateway the CA from a ConfigMap or a Secret with gateway.oidcCA.configMap or gateway.oidcCA.secret (and gateway.oidcCA.key, default ca.crt); the chart mounts it and sets --oidc-ca-file. The issuer's security group must also admit the node and pod subnets, and the chart's default NetworkPolicy must let the gateway reach the issuer. The default limits egress of the pods that hold keys or dial out (the gateway, the leader, the callout and the controller) to DNS, the Kubernetes and Substrate APIs, the release's own Services, OTLP and model providers on 443. An issuer on a private address and another port is blocked, and sign-in fails with a timeout to the issuer. Add a rule for it with networkPolicy.egress.extra (a list of NetworkPolicy egress rules, added to each of those pods). This example admits an issuer at one address on port 8443:
networkPolicy:
  egress:
    extra:
      - to:
          - ipBlock:
              cidr: 192.0.2.10/32   # the issuer's address
        ports:
          - protocol: TCP
            port: 8443
Name administrator groups with config.substrate.identity.admin_groups or gateway.adminGroups, and add other gateway flags with gateway.extraArgs.
Reaching the admin listener
The chart exposes the admin Service on a ClusterIP only. For laptops, set admin.expose.type to LoadBalancer or Ingress. A LoadBalancer needs admin.expose.loadBalancer.sourceRanges (the client ranges allowed) and takes admin.expose.loadBalancer.annotations, for example the ones that make an internal network load balancer. Set admin.url to the https address laptops use (required for LoadBalancer; login --kube sends a credential only to that address) and admin.tlsSecretName to a kubernetes.io/tls Secret for that name. Without a Secret the listener presents its in-cluster certificate, which laptops don't trust for other names, so give them --admin-ca-file.
Egress and credentials
- Install the Kubernetes credential provider with its default. Its namespace policy starts empty, so grant each atespace the namespace that holds its Secrets. The DefenseClaw chart does this for the launcher atespaces. After a manual edit, restart
k8s-credential-provider. - HTTPS calls from tools need the projected trust bundle. For Python,
SSL_CERT_FILE=/run/ate/egress-trust-bundle/trust-bundle.pemworks, and the directory form doesn't. - Bedrock. Add an
httpsrule tobedrock-runtime.REGION.amazonaws.comwithreplaceHeadersonAuthorization(prefixBearer) and acredentialUriof the formate-secret://k8s.io/default/NAMESPACE/SECRET/KEY. The Secret holds a short-lived Bedrock API key and the actor sends a placeholder. This works on gVisor and microVM. With DefenseClaw, models are reached through the guardrail proxy and this rule belongs to the proxy, not to actors. - If your VPC has a Bedrock interface endpoint with private DNS, its security group must admit the node security group on 443, or calls fail with a 503 timeout. DefenseClaw's guardrail proxy also needs the endpoint's address in
guardrail.allow_private_upstreams.
The token issuer
Set a unique issuer per cluster, then set the same value in substrate.identity.issuer:
defenseclaw substrate setup --install-file install.yaml --issuer https://UNIQUE-HOST --yes
ate-setup deploy ate-system --config install.yaml
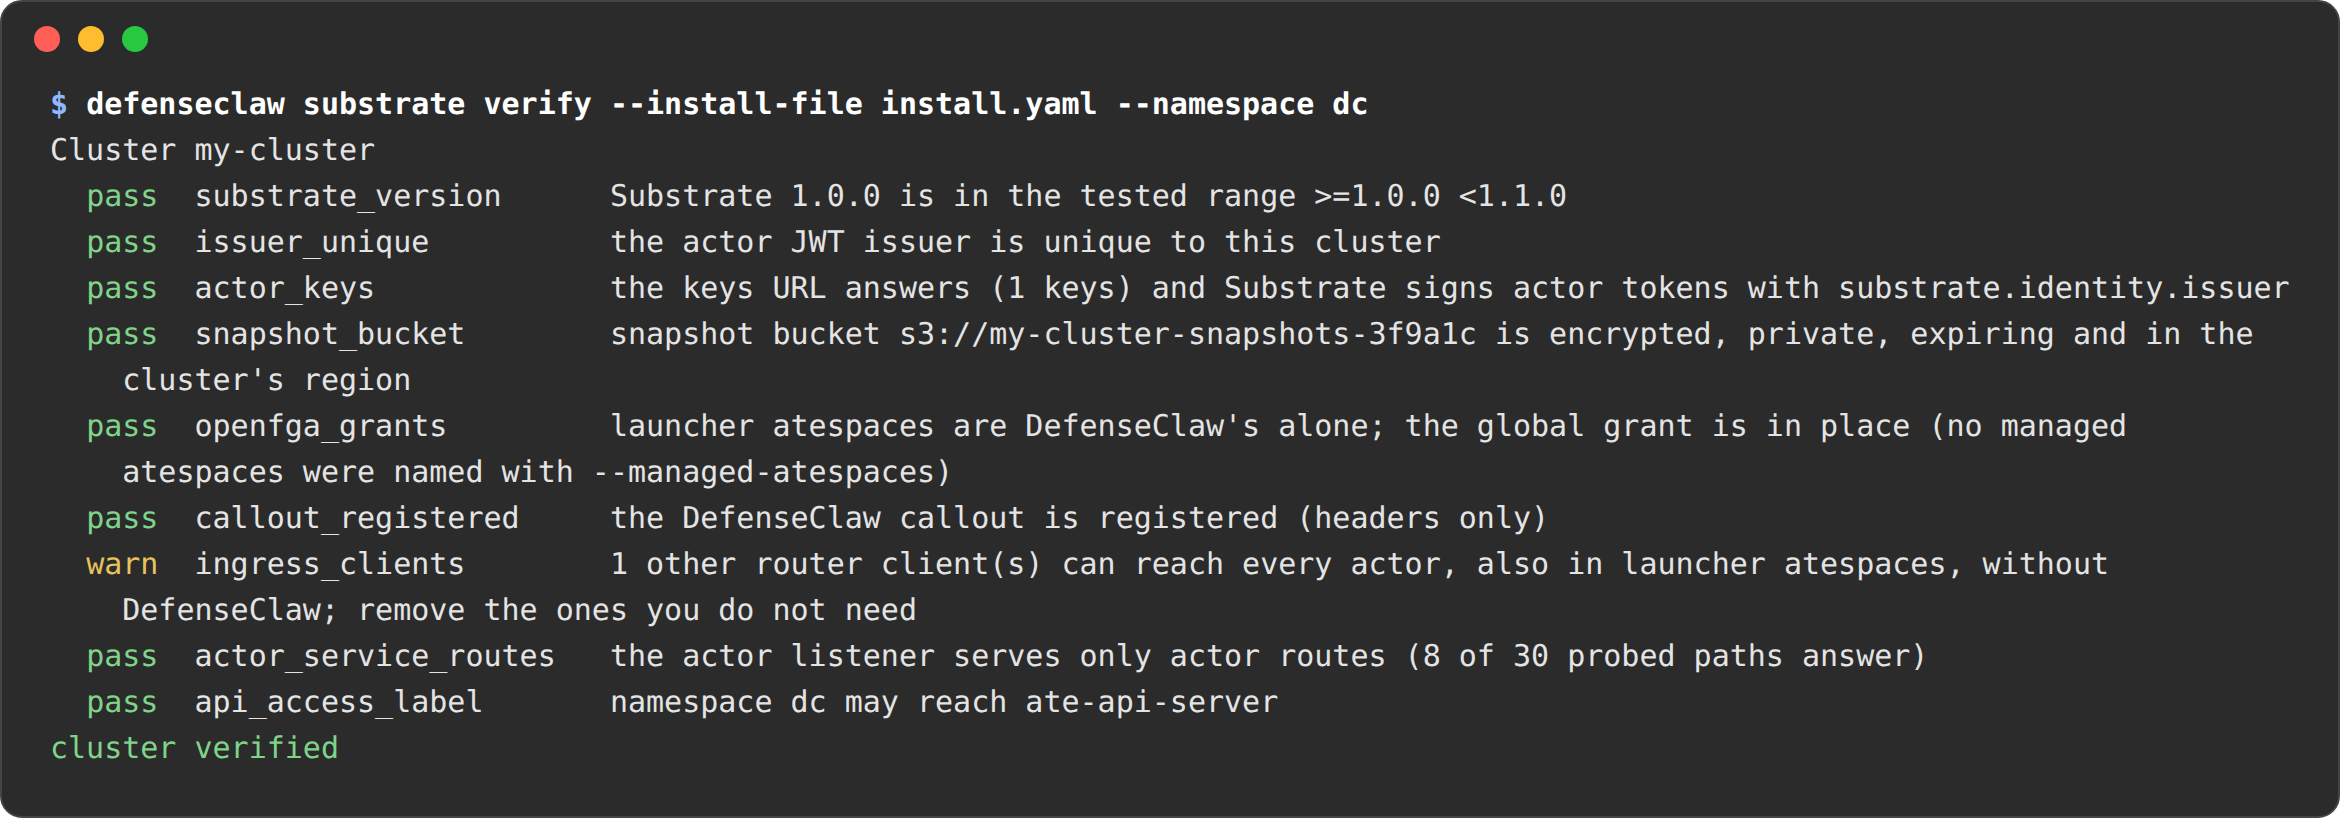
The default issuer is the same on every cluster, so an actor token of one cluster would verify in another. The name doesn't have to resolve: the gateway compares iss with substrate.identity.issuer as a string and reads the signing keys from the idp Service (https://idp.<substrate namespace>.svc/openid/v1/jwks), whatever the issuer is. setup --issuer checks that this keys URL answers (through kubectl, when it reaches the cluster), and verify checks it again after the install (the actor_keys check). Real federation, a verifier outside the cluster, needs a public host with a certificate in front of that Service. An issuer that is only a string verifies only inside the cluster.
Things that tripped us
- In zsh,
"$ACCT:role"is a history modifier and builds a broken ARN. EKS then says "Cross-account pass role is not allowed". Use${ACCT}. create-clusterhas no dry run. Check subnets, roles and versions first.- A worker pool that asks for more actors than there is room for answers "no worker has room for the actor". A golden-snapshot build also takes a worker.
- Deleting the instances of a managed node group by hand makes the autoscaling group recreate them. Delete the node group.
Then continue with the open-source walkthrough.
Troubleshooting Agent Substrate
Symptoms, causes and fixes for DefenseClaw on Agent Substrate - no free worker, the ask delay, unattended templates, drift and policy conflicts, another callout, version, issuer, bucket and kit skew - and a section written for the agents themselves.
Threat model
What DefenseClaw on Agent Substrate defends against, what it trusts, and what it does not defend - trust boundaries, attackers, mitigations and out-of-scope threats.